
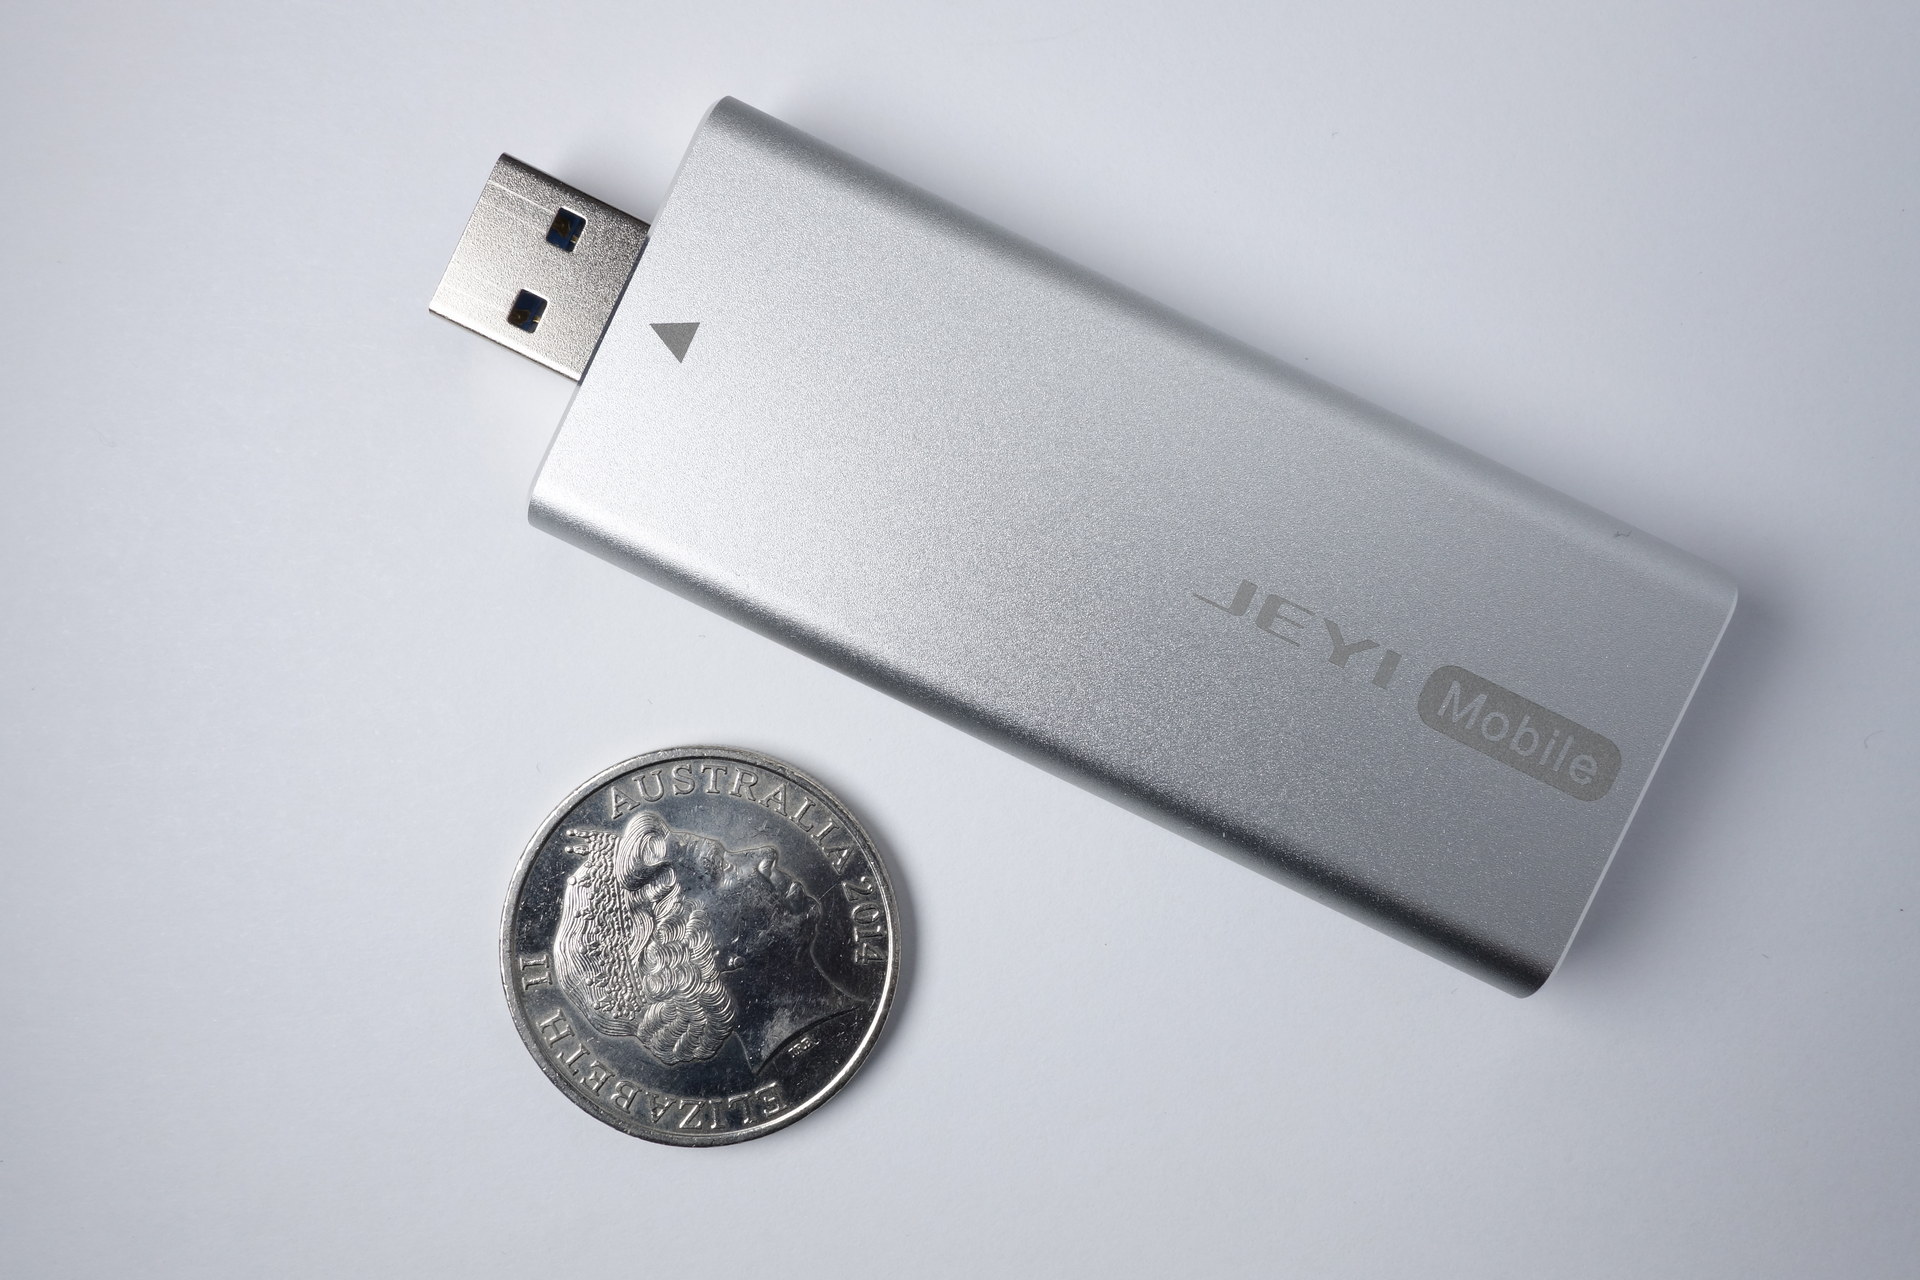
The JEYI X6 is the second SATA to USB bridge I'll be reviewing, since the Sintech one died on me. I picked this one up on AliExpress from the seller JEYI Group for just over $9 US including delivery.

The most important criteria for me would be size, but the JEYI X6 was just too damn sleek looking to not buy. It's retractable connector is what makes it longer than it needs to be. The enclosure itself measures 74.6mm x 31.8mm x 9.5mm (long x wide x thick) when the connector is retracted and is 11.5mm longer with the USB connector out.

The aluminium enclosure feels quite thick and premium, measuring in at 1.2mm thick. The SSD you intend to install must not be wider than 22.1mm.

The front and end pieces are each held in place by two screws, which screw into countersunk holes. The two pieces themselves are made from aluminium, but have a different finish to the main body. They are not as shiny (reflective) as the rest of the body.
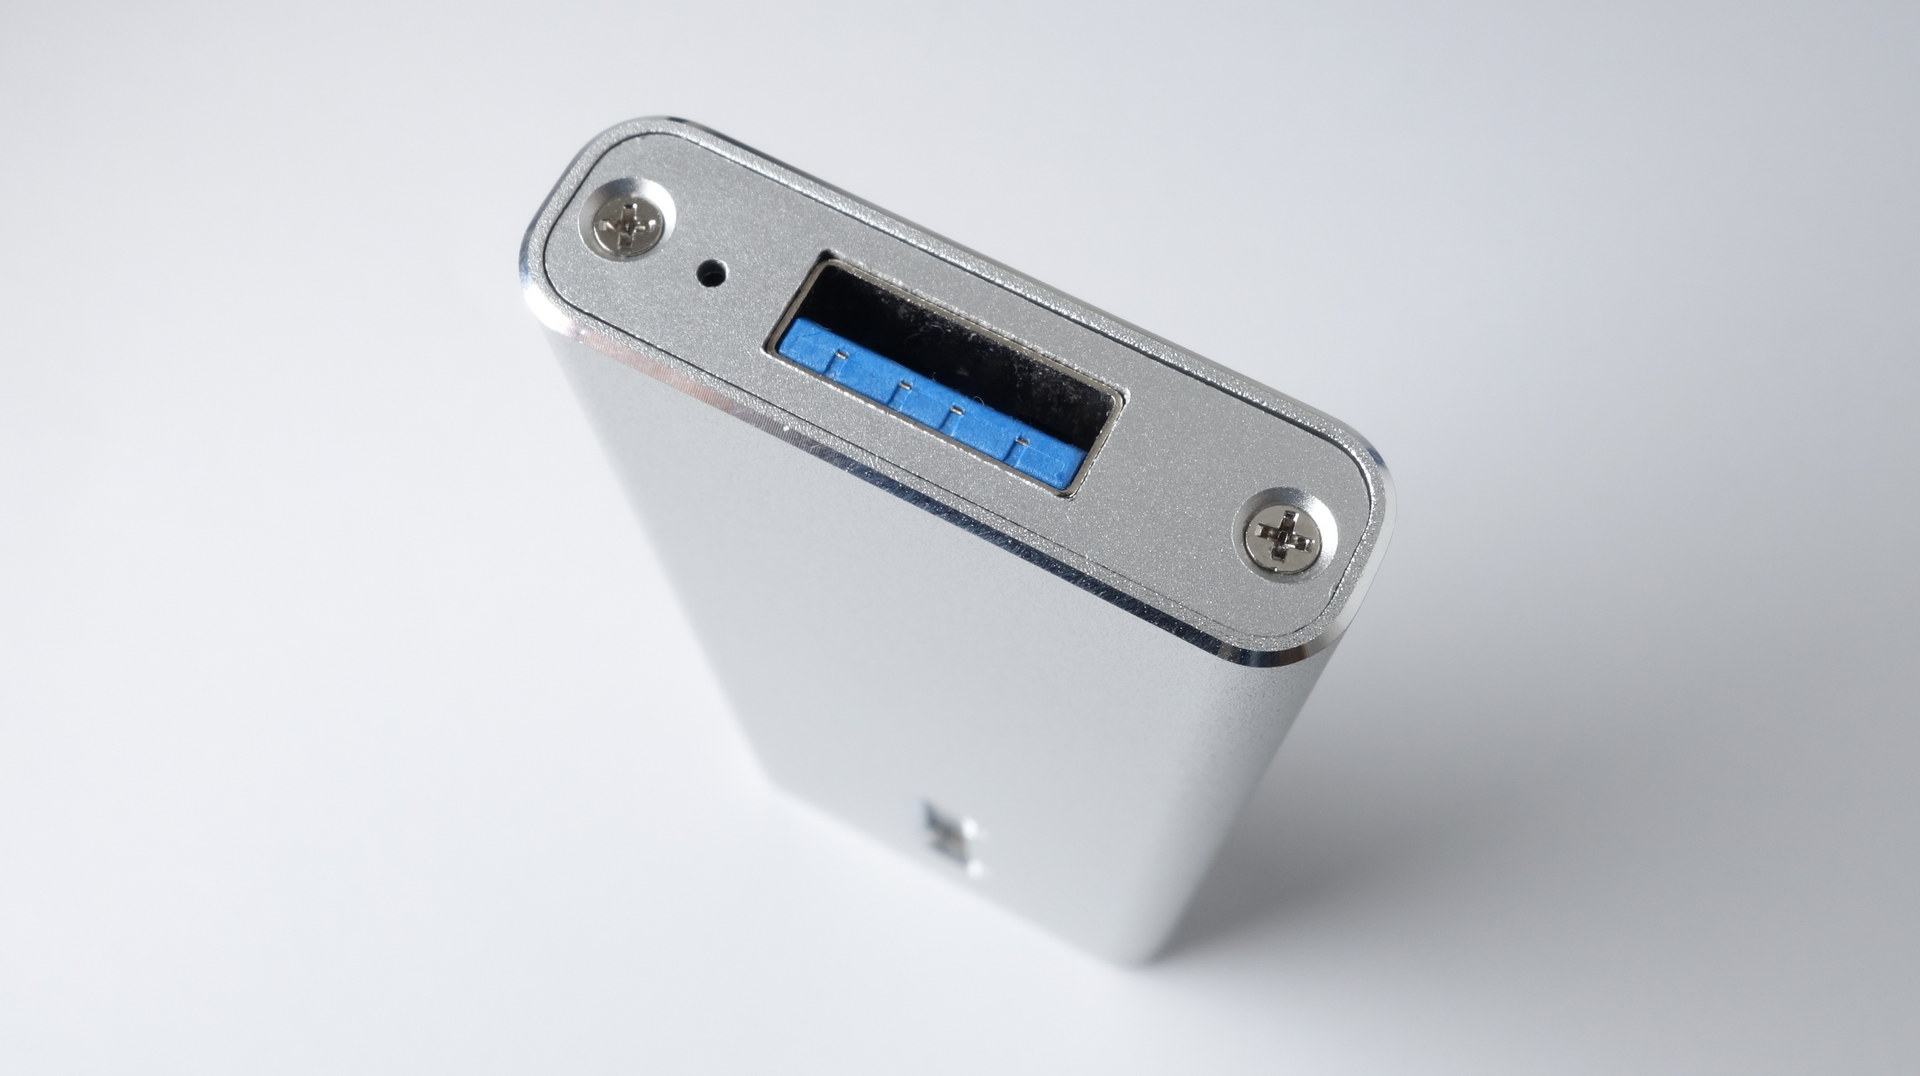
There is a small hole next to the connector which is the activity indicator. Its blue light isn't that bright and is obstructed when plugged into a USB port. One may wish to drill a hole on the top surface of the drive and remount the LED facing up from the circuit board. The USB Type-A connector cutout is also very tight out of the box, and may require some sanding down with some high grit sandpaper.
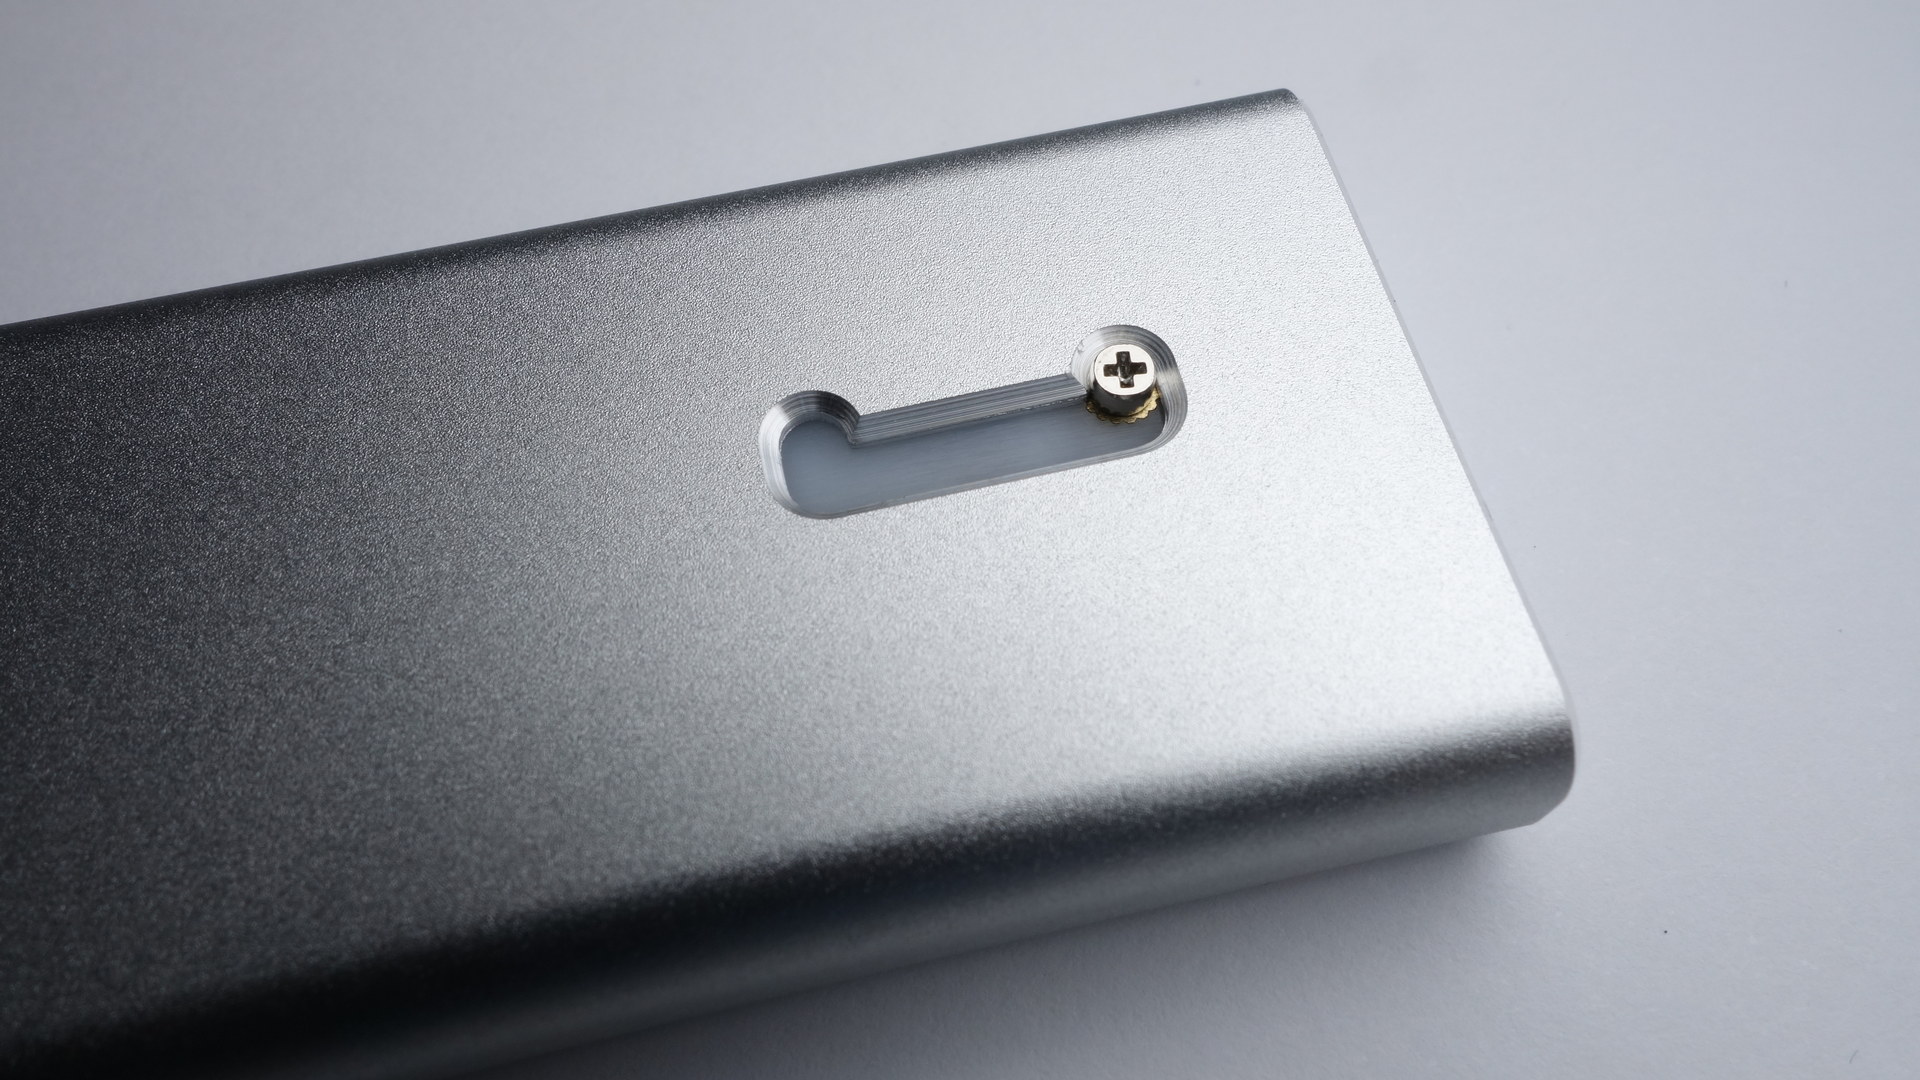
The bottom side of the device has a cutout for the USB connector retracting mechanism. One can use their nails to pull the screw down and then slide connector in and out. The mechanism is spring loaded, which locks the connector open or closed.

The top side of the PCB houses the M.2 connector which is B-keyed, meaning PCIe 4-lane SSDs will not fit and PCIe 2-lane SSDs will not work. There are holes cut out to support both 2230 (30mm long) and 2242 (42mm long) sized cards, though I have yet to find a commercially available SATA based 2230 SSD. The top side also houses the activity LED, soldered in perpendicular to the PCB in order to shine out of the hole next to the connector. One could easily replace the LED so it faces up and then drill a small hole on the top surface of the enclosure. My board is labelled "U3AGNGF-ASM JY VER:1.4".
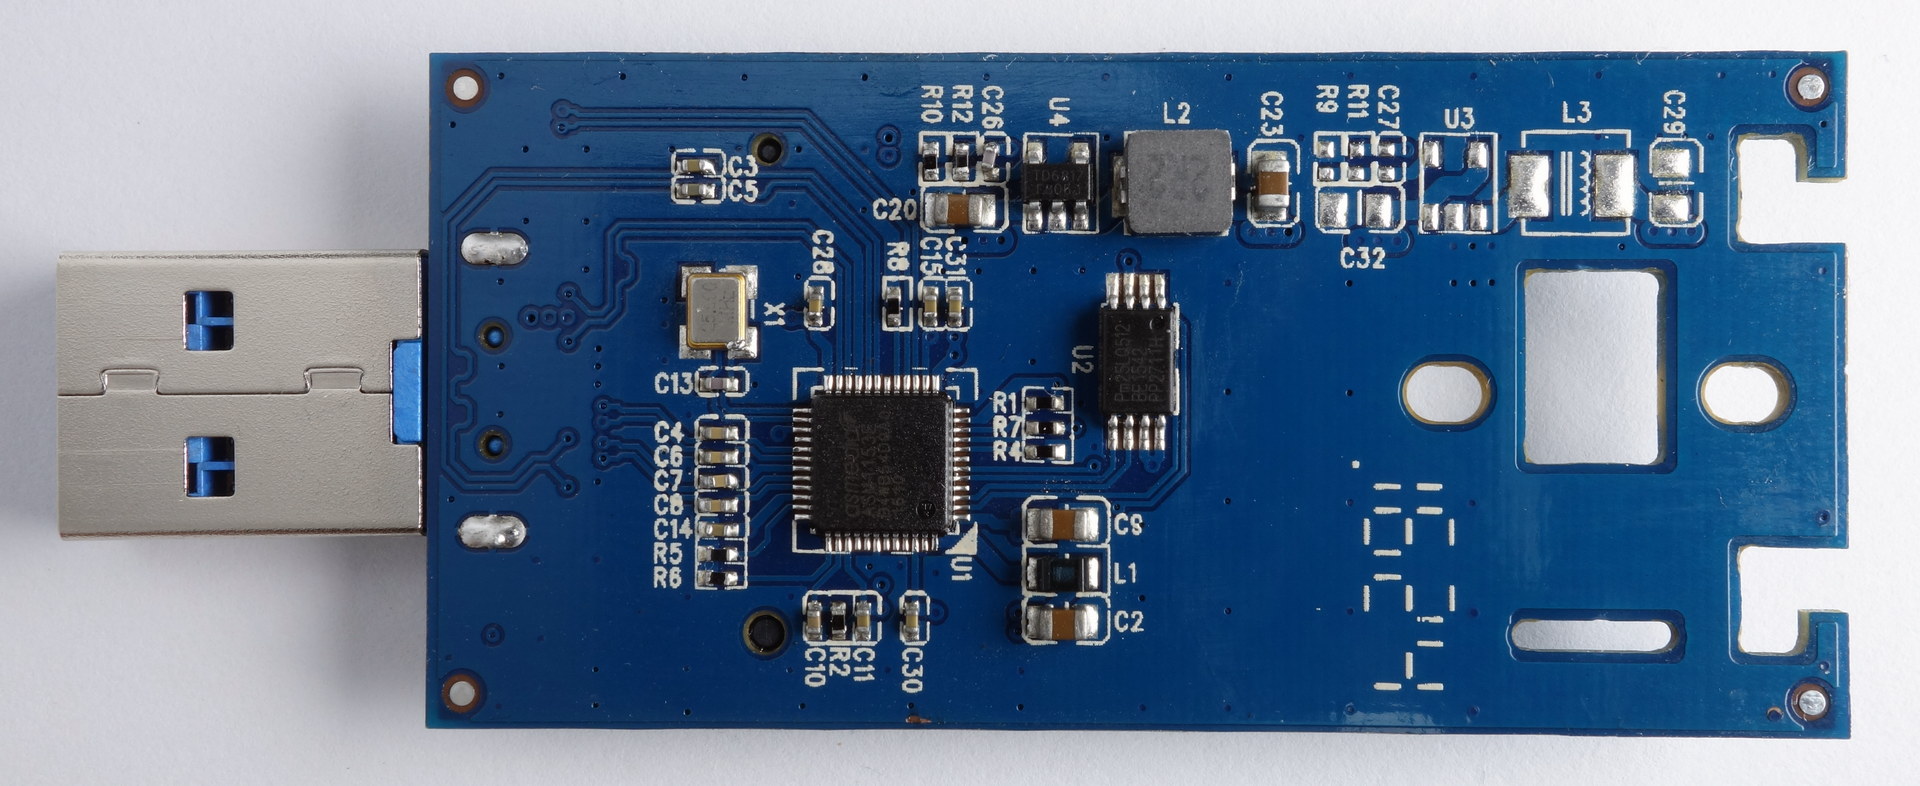
All the magic happens on the bottom side of the board. The JEYI X6 is powered by the ASMedia ASM1153E SATA3 to USB3.0 bridge.
There is a 512Kbit SPI flash which is used to store the USB vendor and device ID reported to the host device, as well as any other vendor specific programming.
The 3.3V rail required by the SATA SSD is provided by a TD6817, a high efficiency monolithic synchronous buck regulator, more than capable of providing the full 4.5W that USB3.0 can provide.
Assembly

The adaptor arrives in pieces without instructions. Here are the assembly instructions if you're having trouble.
- Insert your SSD into the connector
- Place the gold retaining nut (looks like a spool) into the corresponding cutout on the end of the SSD
- Push the SSD flat against the PCB and screw in the smallest screw (the flat headed one) from the underside of the PCB into the retaining nut
- Attach the plastic retaining clip to the bottom side of the PCB. The square footprint on the plastic fits into the rectangular cutout on the PCB. Ensure the bottom of the O-shaped part is pushed into the long slit cutout. The plastic should hold itself onto the PCB.
- Slide the PCB into the enclosure until the hole (metal threaded insert) on the plastic retaining clip lines up with one of the ends of the cutout on the bottom side of the enclosure.
- Screw in the screw with the tall head into the metal threaded insert.
- Screw in the end pieces of the enclosure with two of the long screws each. Ensure the countersunk holes face the outside of the device.
Results
Most of the results here are very similar to the original Sintech adaptor I previously reviewed. Please read that review for explanations. I will just gloss over the details here.
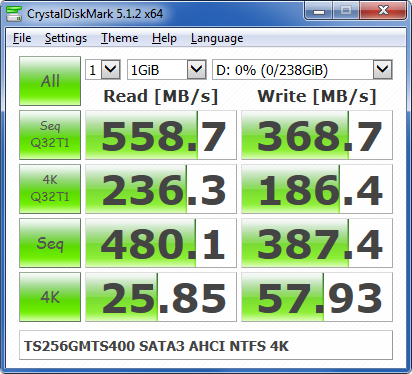
This is the raw performance of the Transcend SSD connected to an M.2 slot through a SATA3 interface in AHCI mode. The sequential read speeds are on the verge of saturating SATA3's real world throughput.

When connected via regular USB3.0 (BOT: Bulk-Only Transfer) through the ASM1153E in the JEYI X6, we see similar results to the JMS578 in the Sintech adaptor.
On an OS with UASP support, in this case Windows 10, we are able to connect in UASP mode.
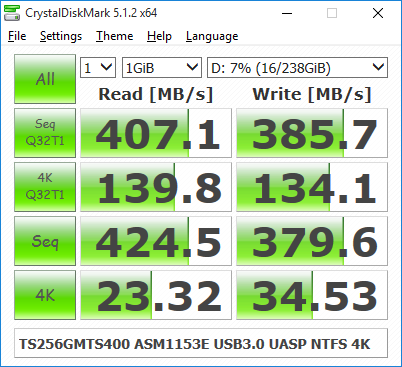
In UASP mode, we see quite an improvement over the JMS578. Real world file copying managed to reach 410MB/s read and 285MB/s write. The write speed is somewhat puzzling as it is nowhere near the almost 400MB/s from the benchmark. More investigation is required.
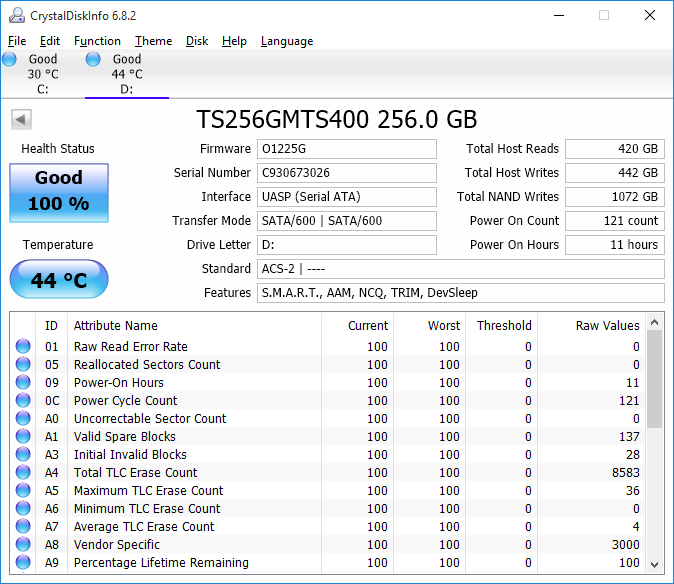
The ASM1153E chip also stayed well under 50 degrees Celsius with an ambient temperature of 20 degrees. My Transcend SSD also stayed quite a bit cooler too. I have not had any overheating issues so far.
TRIM Check concluded that TRIM is working in UASP mode. Windows generally TRIMs deleted files just under 10 seconds after deleting them. TRIM Check failed to detect TRIM working in Windows 7 in BOT mode.
Conclusion
The JEYI X6 is a very stylish and capable adaptor. Its size isn't as small as I'd like it, but is still acceptable for a USB drive. The width of the adaptor does mean it will interfere with adjacent USB ports, however, most of my devices either don't have adjacent USB ports or are spaced enough apart to still allow another USB device to be plugged in. Real world sequential write speeds are a bit slower than what the JSM578 can offer, but then again, how often will you get the chance to appreciate write speeds higher than 285MB/s anyway.
Activity LED Mod
Not being able to see the activity indicator LED was really getting to me. I don't safely eject or unmount drives much and the fear of a dirty filesystem is present every time I go to unplug. So I got out my drill and drilled a 2mm diameter hole directly above the LED on the circuit board while the connector is in its extended state. That is approximately 5mm from the connector's side's edge and 6mm from the side edge.
I desoldered the existing blue LED and soldered in a white 1206 sized LED from an LCD backlight strip. 1206 is about the largest SMD LED that will fit into this design. The LED must not extend further than the M.2 connector (toward the side edge), otherwise the circuit board will not slide into the enclosure.
I contemplated what I would fill the hole up with to act as a barrier and light diffuser. Sticky tape would attract dust and wax would be too easy to scratch out. I ended up finding a bead of silica desiccant that made a tight fit into the hole. I stuck a piece of Scotch Magic tape against the bead on the inside to act as a light diffuser, making the light uniform and visible from all angles.
Here is the result:
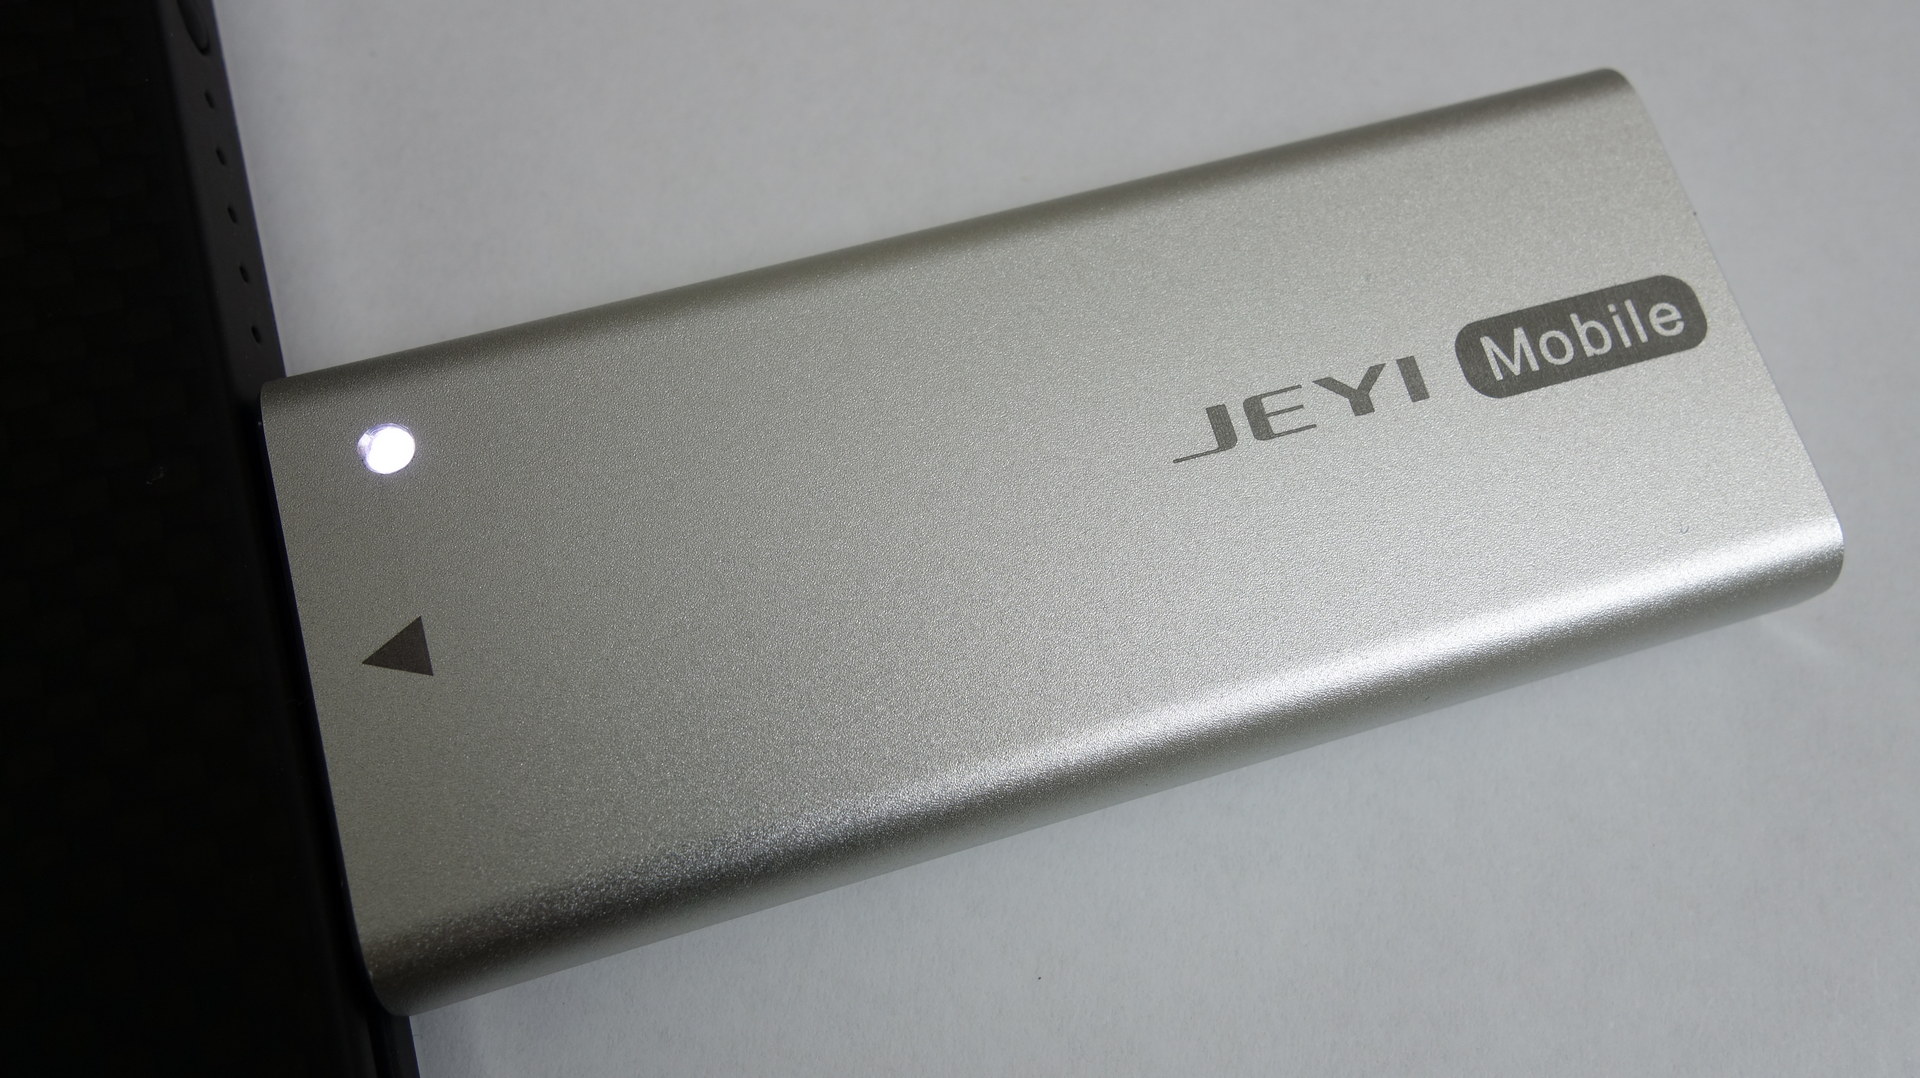
I stuffed up the countersinking, but that can be fixed later on.
I have noticed that the LED turns off after remaining idle for a few minutes. I never saw the LED in the original unmodified state, so I'm not sure if this happens with the original LED. The good news is that the LED will turn back on when there is activity on the drive.