This article contains my personal configurations for the XPS 15" (9550)
About
This article will get Windows 7 working on your Dell XPS 15 (9550) with minimal compromises made to performance and functionality.
All info provided is from BIOS 1.02.00 and uses up to date drivers as of 12th of June 2016.
My hardware configuration from Dell:
- 1080p Matte Non-Touch Screen
- 256GB Toshiba M.2 NVMe SSD (THNSN5256GPU7)
- 8GB (2x4GB) Samsung DDR4 2133MHz Single-Rank RAM (M471A5143EB0-CPB)
- Dell Wireless 802.11ac 3x3 (DW1830 - Broadcom BCM943602BAED)
- 56Wh Battery
- Windows Professional Licence (SLIC)
My current hardware configuration is as follows:
- 512GB Samsung 950 PRO M.2 NVMe SSD (MZ-V5P512BW)
- 16GB (2x8GB) Crucial DDR4 2133MHz Dual-Rank RAM (CT8G4SFD8213)
- Intel AC-7265 - 802.11ac 2x2 Wireless and Bluetooth 4.0
What's working
- UEFI boot
- NVMe through Intel Rapid Storage (Software 'Fake' RAID)
- Switchable graphics (between the integrated Intel 530 and dedicated Nvidia GTX960M)
- Windows 7 activation with the installed SLIC v2.1
- Sleep (S3)
- USB Type-C Port
- USB 3.0 (Through a passive Type-C to Type-A adaptor)
- DisplayPort (Through a passive Type-C to DisplayPort adaptor)
What's NOT working
- Hibernate - Will not resume from hibernation (Error
0xC0000001) - Dell Wireless DW 1830 - Adaptor stops responding after a period of time. Most likely a driver issue (Version 1.400.66.0)
What has not been tested yet
- USB Type-C Port
- USB 3.1
- Thunderbolt
- Internal SATA header
Drivers
The XPS 9550 does not officially have Windows 7 support from Dell. However, the Dell Precision 15 (5510) does have Windows 7 support and is almost identical in hardware with minor differences targeted at business users.
Some drivers can be obtained directly from the hardware/chipset manufacturer, however, you can obtain almost all of them from Dell's support site for the Precision 15 (5510). Dell Precision 15 (5510) Windows 7 x64 Drivers
| Item | Manufacturer Driver | Dell Packaged | Notes |
|---|---|---|---|
| BIOS | 9550 Support (BIOS) |
Highly recommended to updated to the latest BIOS to minimise known problems | |
| Intel RST Preinstall | Intel RST RAID Driver | 5510 Support (Serial ATA) |
This is only required if you have the SATA mode set to RAID in the BIOS. This is required during the Windows 7 installation as Windows 7 setup does not have NVMe drivers built in. Download the zip file and extract onto your Windows 7 installation media. You can also download the installer to install after installing Windows. The installer provides the RST GUI, which can provide RAID info and warnings. The installer is not mandatory. |
| Intel PCH Chipset | Intel INF Update Utility for 100 Series | 5510 Support (Chipset) |
|
| Intel Dynamic Platform and Thermal Framework Driver | 5510 Support (Chipset) |
||
| Intel Management Engine Interface | 5510 Support (Chipset) |
Not required for personal use devices, but at least install drivers to get rid of the exclamation icon in device manager. | |
| Intel USB3.0 xHCI | Intel USB3.0 xHCI for 100 Series | 5510 Support (Chipset) |
|
| Intel USB3.1 xHCI | 5510 Support (Chipset) |
||
| Intel Thunderbolt Controller | 5510 Support (Chipset) |
||
| Intel Thunderbolt Controller Firmware Update | 5510 Support (Chipset) |
You can only update the Thunderbolt firmware after the latest Thunderbolt drivers have been installed | |
| Realtek PCIe Card Reader | Realtek Card Reader Driver | 5510 Support (Chipset) |
|
| Realtek HD Audio | Realtek HD Audio Driver | 5510 Support (Audio) |
If you want two seperate audio output devices for the built-in speakers and 3.5mm jack, do not install the Realtek drivers. If you want the MaxxAudio sound enhancements or want to be able to use the 3.5mm jack as an input jack (including heatsets with a mic - 4 pole 3.5mm), then you must install the drivers. |
| Intel HD 530 Graphics | Intel HD Graphics Driver | 5510 Support (Graphics) |
Highly recommended to stick with the Dell packaged drivers as Dell has customised the Intel drivers for this XPS. I have not tested the Intel drivers (whether switchable graphics works). Install this before installing the dedicated graphics drivers from Nvidia. |
| Nvidia GTX 960M Graphics | Nvidia 900M Series Drivers | The 5510 has Quadro instead of GeForce. Download from Nvidia's website (GeForce > GeForce 900M Series (Notebooks) > GeForce GTX 960M). Ensure you install the Intel graphics drivers before installing Nvidia's. | |
| Dell Wireless Intel Wireless |
N/A Intel Wireless Drivers |
5510 Support (Modem/Comms) |
Windows 7 drivers exist for the Dell Wireless DW1830, however, there are issues which cause the adaptor to stop responding after some use. If you have wireless issues, I'd recommended swapping the wireless adaptor to an Intel one. I have been using an Intel AC-7265 and it has been working perfectly. |
| Dell Power Manager | 5510 Support (System Utilities) |
This installs the Dell Power Manager app which allows you to adjust battery charging parameters (start/stop charge percentage, fast charge aka. ExpressCharge, charge schedule), thermal management and power related alerts. | |
| Dell WLAN Hotkey Driver | 5510 Support (Network) |
This allows the Wireless and/or Bluetooth to be switched with the Fn + PrScr combination. | |
| Synaptics Touchpad (PS/2) | Synaptics v16.3.15.1 Synaptics v17.0.19 Synaptics latest W10 |
5510 Support (Mouse... Input) |
The official Dell Touchpad drivers come with a custom touchpad configuration program. It lacks some features that Synaptics used to offer in their generic drivers. The Dell drivers and Synaptics v19 drivers offer the most natural inertial scrolling, however it does not support pixel scrolling (scrolling occurs in lines instead of pixels). Synaptics v16 is the only version that supports pixel scrolling and contains the most number of configurations in the synaptics menu. I would recommend the Generic Synaptics v16 drivers and fixing up some parameters with a registry hack. |
Setup Preparation
- Obtain an ISO image of the Windows 7 instllation media.
- Create a bootable USB drive containing the Windows 7 installation media. Rufus is recommended to create a EFI bootable drive.
- Plug in the USB drive and start Rufus
- Select the USB drive to use, if not already selected
- Click on the button with the Disc and Drive icon next to the dropdown menu which says ISO Image and select the Windows 7 installation media ISO
- Select MBR Partition Scheme for UEFI
- Select FAT32 filesystem
- Click Start.
- Integrate Intel's USB 3.0 xHCI drivers (For 100 Series chipset) into the Windows 7 installation media (
boot.wimandinstall.wim)- Download the Windows 7 USB 3.0 Creator Utility
- Extract and run the utility
- Locate the root of the USB drive with the Windows 7 installation media
- Click Create Image
- Wait until the utility finishes integrating into all the wim files.
- Extract the Intel RST (RAID) Preinstall driver to the USB drive. Ensure you extract it if you downloaded a zip file. If you disabled RAID mode in the BIOS setup, you will need to obtain NVMe drivers for your specific PCIe SSD.
BIOS Setup
Enter the BIOS setup by pressing F2 after turning the device on.
- Disable Secure Boot (Secure Boot > Secure Boot Enable)
- Enable Legacy Option ROMs (General > Advanced Boot Options). Windows 7 setup will freeze on boot if this is not enabled.
Windows Setup
- Plug the USB drive in
- Turn the laptop on and press F12 to show the boot menu
- Under UEFI Boot, select the USB drive with the installation media.
- Wait for setup to boot
- Install Windows 7 as usual, until you get to the disk partitioning step. You will get a warning No drives were found. Click Load Driver to provide a mass storage driver for installation.
- Click Load Driver and then click Browse.
- Navigate to the folder the Intel RST drivers (or NVMe drivers) were extracted to earlier. Click OK.
- There should now be a driver available in the list of drivers available (Intel Chipset SATA RAID Controller or otherwise). Click Next.
- Partition the disk as you wish. It's highly recommended that you delete all existing partitions and start from scratch. To recreate the partition table on the disk, we can access the
diskpartutility through a command prompt:- Press Shift + F10 to open a command prompt
- Run
diskpartto run the disk partitioning utility - Enter
list diskto list the accessible disks - Enter
select disk X(whereXis the disk number listed) to select a disk to work on - Enter
cleanto wipe the partition table. Be careful! Ensure you have the right disk selected. - Enter
exitto exit the disk partitioner and thenexitthe command prompt.
- Install Windows
- Install drivers roughly in the order listed above in the drivers section.
Activating Windows
Dell has installed a v2.1 SLIC table in the BIOS and can be used to activate windows. Simply use the Dell OEM keys, or use Windows Loader.
| OS | Edition | Key |
|---|---|---|
| Windows 7 | Home Premium | 6RBBT-F8VPQ-QCPVQ-KHRB8-RMV82 |
| Windows 7 | Professional | 32KD2-K9CTF-M3DJT-4J3WC-733WD |
Syanptics Touchpad v16 Adjustments
If you installed one of Synaptics' generic touchpad drivers, you will need to adjust a few registry values to fix a few issues such as:
- Slow pointer movement - No option to adjust this parameter in Synaptics settings. Increasing
PointerMotionSpeedto around 512 makes it a comfortable pointer speed. Increase the windows pointer speed a tad to take advantage of pointer acceleration. - Misaligned bottom-right button (right click) - Adjust the left and top edges (
RightButtonZoneLandRightButtonZoneT) of the button to match the physical trackpad button layout.
| Key | Value Name | Type | Value (Hex) | Value (Dec) |
|---|---|---|---|---|
HKEY_CURRENT_USER\Software\Synaptics\SynTP\TouchPadPS2 |
PointerMotionSpeed |
DWORD |
0x200 |
512 |
HKEY_CURRENT_USER\Software\Synaptics\SynTP\TouchPadPS2 |
RightButtonZoneL |
DWORD |
0xe10 |
3600 |
HKEY_CURRENT_USER\Software\Synaptics\SynTP\TouchPadPS2 |
RightButtonZoneT |
DWORD |
0x640 |
1600 |
You should also increase the following:
- Scrolling speed
- Two-finger scrolling speed
- Pinch Zoom rate
Screen Calibration (1080p Matte Non-Touch)
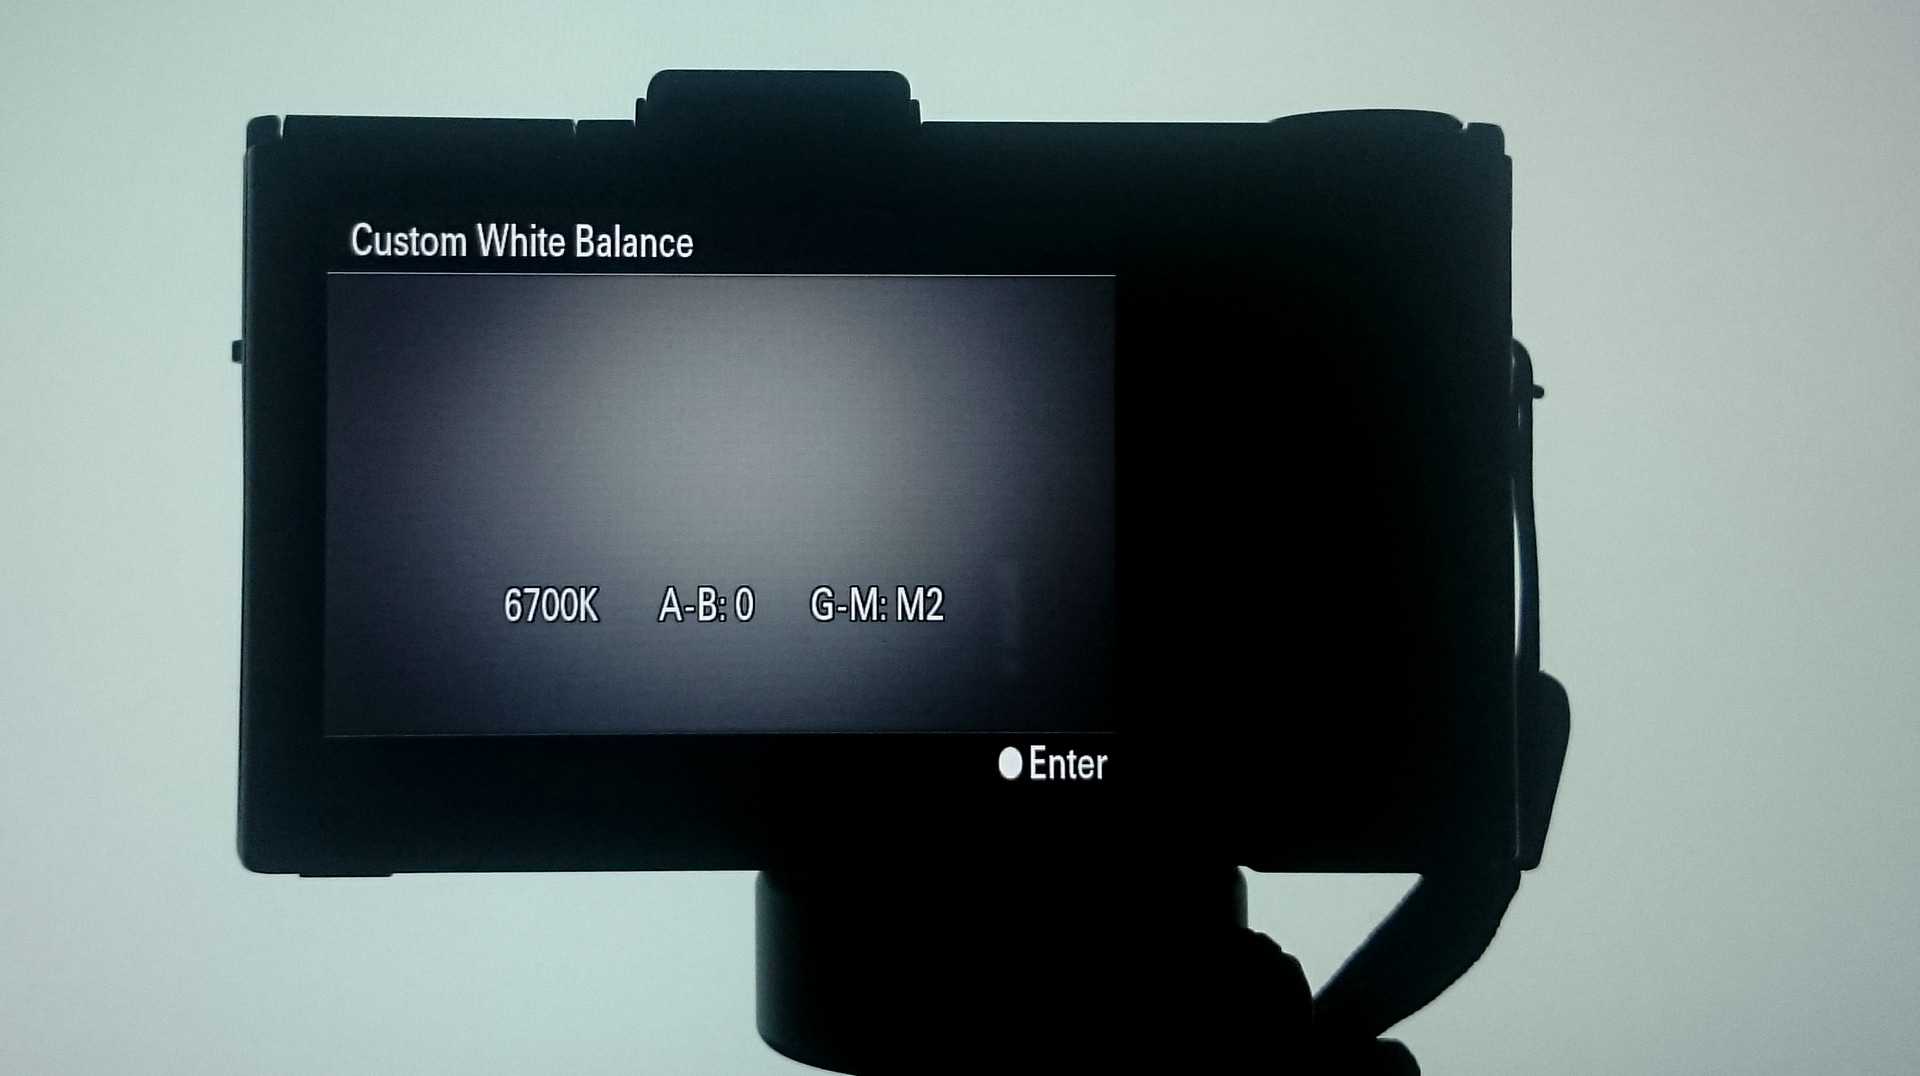
A white balance analysis using my RX100M2 shows my panel has a white point of 6700K (slightly blueish) with a green-magenta shift of M2 (green is too strong).
To balance it out to 6500K, we can adjust the green and blue channels down slightly in the Intel HD Graphics Control Panel.
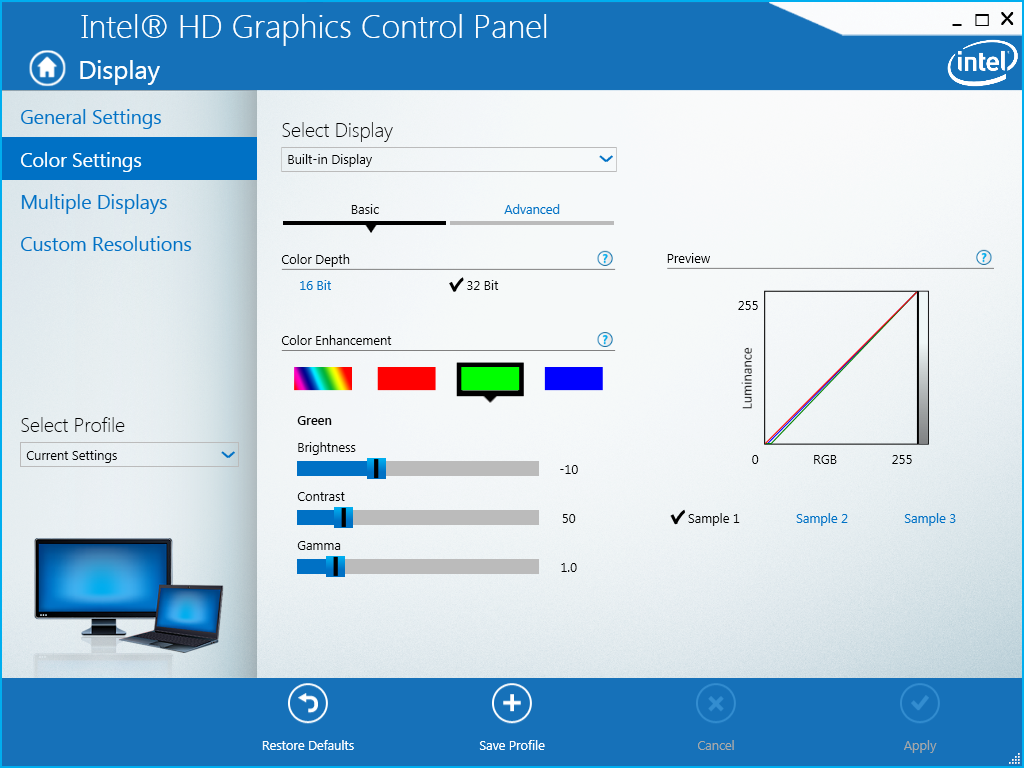
| Channel | Brightness Adjustment |
|---|---|
| All | 0 |
| Red | 0 |
| Green | -10 |
| Blue | -4 |