BIOS Administrator/Supervisor Password Bypass/Removal
These instructions are provided without warranty. Use at own risk.
Please be careful when playing with hardware. You can easily break or damage components.
This guide will run through bypassing and changing/removing a BIOS password. This guide can also bypass the supervisor password prompt which occurs when the incorrect password has been entered too may times, resulting in the message "System Security - Security password retry count exceeded". This guide will use Lenovo BIOS and UEFI as examples.
The rough steps you will need to take are:
- Disassemble your device
- Locate the EEPROM chip on the mainboard
- Find a datasheet for your EEPROM chip and/or locate the
SLCandSDApins - Short the
SCLandSDApins while the BIOS checks the password - Change/remove the password
Step 1: Disassemble
Start by removing the back cover of your laptop. Chances are that you won't find the EEPROM behind the exposed parts behind the back cover. You will probably need to remove the entire back/base of the laptop or even get to the other side of the mainboard. Most Lenovo laptops have the EEPROM on the other side of the mainboard (the keyboard side).
Step 2: Locate the EEPROM
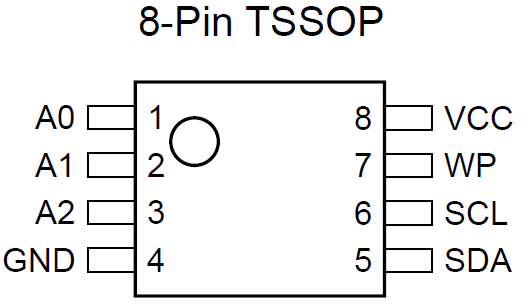
You are looking for an 8-pin Serial EEPROM chip, though it can come in a 5 pin SOT-23 package. To confirm what chip you have, simply read the characters off the chip and Google it. One with results for a serial EEPROM would indicate the correct chip. Due to the small packages of these chips, the characters marked on the chip may not be the model number of the chip and may be an abbreviation. Also, if you find results for serial flash chips with a capacity of a few hundred K (Kilobits) or a few M (Megabits), chances are that you have found the chip the Embedded Controller or BIOS/UEFI is stored in. Keep looking!

Step 3: Find a datasheet and/or locate the SLC and SDA pins
On most 8-pin packages, the SDA and SCL pins are on pins 5 and 6 respectively. Pin 1 can be identified by the dot/circle etched next to it (some packages may have a semicircle etched on the edge between pins 1 and 8) and the pins are numbered anticlockwise.
Step 4: Ensure the BIOS reads NULL from the EEPROM when checking the password
The BIOS communicates with the serial EEPROM through a bus called I2C. The serial clock and data pins are open-drain and are grounded in a specific order for communication to occur. We want to ensure that the only data that gets read out is NULL. This should fool the BIOS into thinking there is no password set.
We can conveniently tie both the SCL and SDA pins together in order to achieve what we want. Note that tying SCL or SDA to Ground or Vcc will cause the BIOS to hang, as transitions between low and high are part of the I2C protocol.
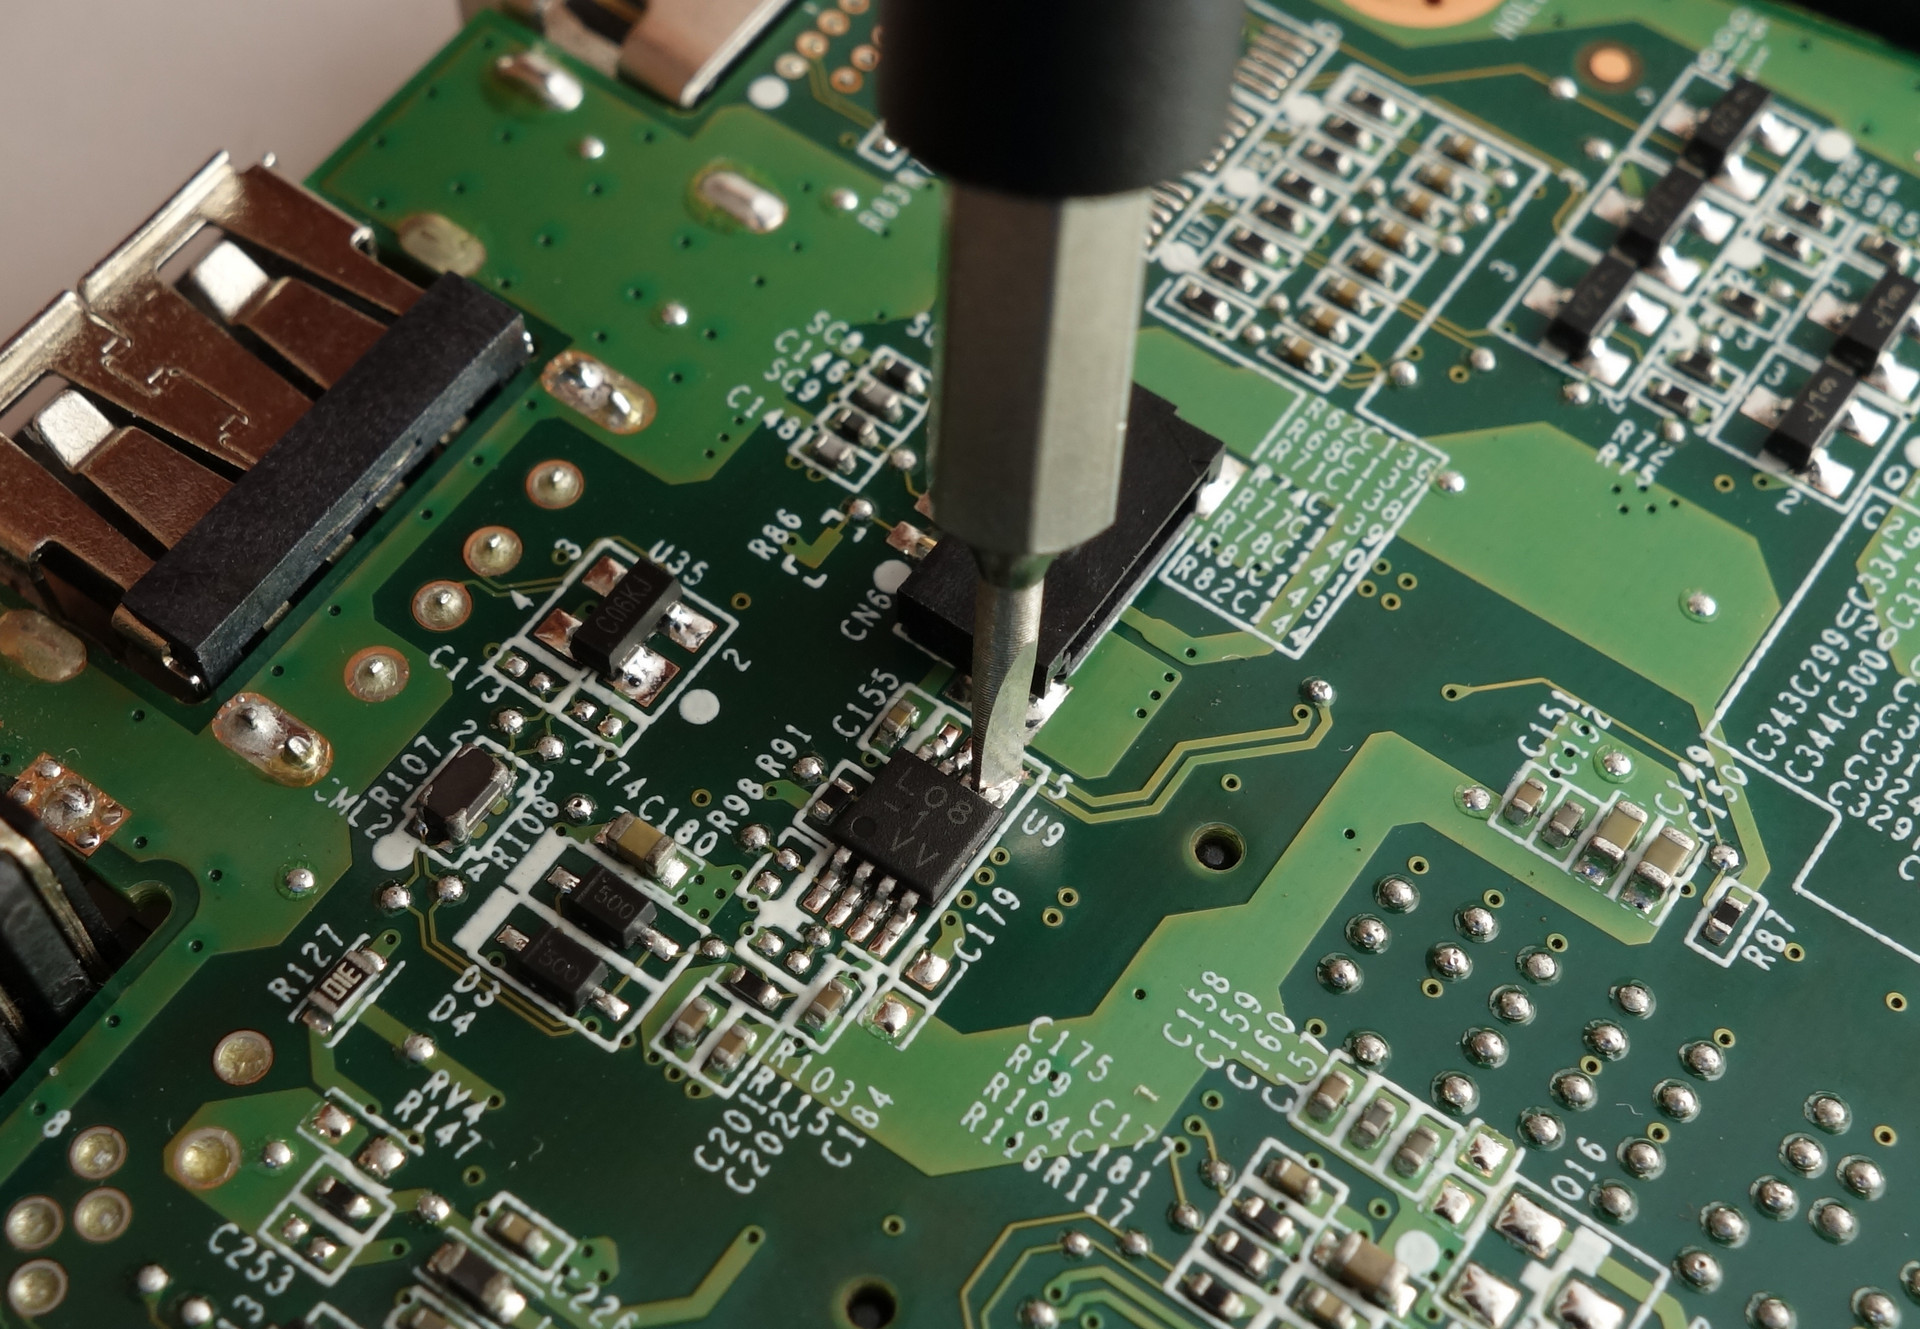
We can simply short the SCL and SDA pins together with a conductor such as a flat head screwdriver or a paperclip.
The procedure seems to be slightly different for BIOS and UEFI systems. BIOS based systems seem to read the password from the EEPROM after the user pushes the ENTER key after entering the password, while UEFI based systems seem to read all the configuration required from EEPROM into memory right after the power is turned on. BIOS based systems will be the easiest to bypass, while UEFI based systems may require a few goes before you succeed.
You can determine whether your system is BIOS or UEFI based by checking specifications or the user manual to see if it supports UEFI boot. You can also enter the BIOS/UEFI setup in read-only mode by using an empty password. If the "Boot" menu mentions "UEFI", then you have a UEFI based system, otherwise you have Legacy BIOS.
Chances are you have removed the keyboard to get to the EEPROM chip. As some of the steps require the use of a keyboard, you may wish to plug a USB keyboard in to use. Otherwise you'll need to awkwardly poke and prod underneath the keyboard.
BIOS based procedure
- Turn on the device
- Press F1 repeatedly to enter BIOS setup and get the password prompt
- Short
SDAandSCLpins and keep it shorted. - Press ENTER on the keyboard and then un-short the two pins. You should get an OK prompt. If you get a notice BIOS setup is locked. Only the System Supervisor can make changes, then you have not shorted the two pins successfully. Restart the computer and try again.
- Navigate to the Security menu > Password menu
- Highlight the Supervisor Password option
- Short the
SDAandSCLpins again and keep it shorted - Press ENTER on the keyboard and then un-short the two pins. You should get a prompt for a New Password and Confirm New Password. If you get a prompt for the Current Password, close the menu and try again.
- Enter any password you want to set, or leave it blank for no password.
- After confirming the password, press F10 to save changes.
- If you are trying to remove the the "Security password retry count exceeded" message, you must load default settings by pressing F9 and save with F10. This does not affect passwords.
UEFI based procedure
- Turn on the device
- As soon as the backlight of the screen turns on, short
SDAandSCLpins and keep it shorted. - Press F1 repeatedly to enter BIOS setup. You should be taken directly into the BIOS setup. Un-short the two pins. If you are shown a password prompt, switch the device off and try again.
- Navigate to the Security menu > Password menu and set a Supervisor Password
- After confirming the password, press F10 to save changes.
- If you are trying to remove the the "Security password retry count exceeded" message, you must load default settings by pressing F9 and save with F10. This does not affect passwords.